Testing your car battery voltage is an important part of routine maintenance. A healthy battery is essential for starting your vehicle and providing power to various electrical components, such as lights, radio, and air conditioning. If your car is not starting properly or is experiencing electrical problems, checking the battery voltage is the first step to diagnosing the problem. Fortunately, testing battery voltage is easy and can be done with a multimeter. Here is a step-by-step guide to testing your car battery voltage.
Step 1: Gather the Tools You Need
To test your car battery voltage, you will need a few basic tools: a digital multimeter, gloves, and safety glasses. Although testing a battery is easy, it is always a good idea to wear gloves and safety glasses as a precaution. Car batteries contain acid that can be harmful if spilled. If the battery terminals are corroded, you may also need a battery terminal cleaner.
Step 2: Turn off the engine and electrical components
Make sure the car’s engine is turned off before you begin testing. Also turn off all electrical components, such as lights, radio, and air conditioning. This will ensure that you are only testing the battery voltage and not the power draw of the car’s systems, which can lead to incorrect readings.
Step 3: Set the multimeter
Set your multimeter to measure DC voltage (usually marked “V” with a line next to it and sometimes three dots below it). Make sure your multimeter has a range of 12 volts or higher. Most car batteries have between 12 and 14 volts when the engine is off.
Step 4: Test the voltage with a multimeter
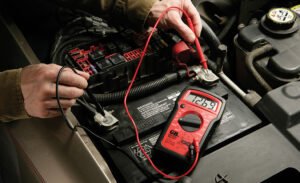
Now it’s time to measure the voltage of your car’s battery. First, locate the battery terminals under the hood of your car. Most car batteries have two terminals: a positive (+) terminal and a negative (-) terminal. The positive terminal is usually marked with a red cap or red, while the negative terminal is usually black. Next, connect the red (positive) wire from the multimeter to the positive terminal of the battery. Then, touch the black (negative) wire from the multimeter to the negative terminal of the battery. With the wires securely connected, check the voltage on the multimeter display.
Step 5: Interpret the Voltage Readings
A voltage of 12.6 volts or higher means that your battery is fully charged and in good condition. This means that the battery has enough charge to power the electrical components of the car. Readings between 12.4 and 12.5 volts are acceptable, but the battery is slightly less full. The battery is still usable, but may need to be charged sooner if the voltage drops further. If the reading is between 12.0 and 12.3 volts, the battery is undercharged and may be showing signs of wear. Your car may still start, but you may need to test or charge it further. Readings below 12 volts usually indicate a weak or partially discharged battery. If the voltage is below 11.8 volts, the battery may not have enough charge to start the car. In this case, the battery may be low or may need to be charged or replaced.
Step 6: Test the Voltage with the Engine Running
To test the condition of your alternator (the alternator charges the battery while the car is moving), you can test it with the engine running. Start the car and let the engine idle. Use the multimeter to measure the voltage between the battery terminals again. The reading should be between 13.5 and 14.5 volts. This indicates that the alternator is functioning properly and is charging the battery while the car is moving. If the voltage remains at 12.6 volts or lower while the engine is running, there may be a problem with the alternator and the battery is not being charged properly.
Step 7: Clean the battery terminals (if necessary)
If you notice corrosion (a white powdery substance) on the battery terminals, this will affect the accuracy of the voltage reading. Corrosion can also prevent the electrical current from flowing properly. Clean the terminals with a battery terminal cleaner or a mixture of baking soda and water. Always wear gloves and safety glasses when cleaning and be careful not to get any cleaning solution on the battery itself.
Step 8: Test the battery load (optional)
For a more thorough test, you can perform a battery load test. This involves putting a load on the battery to see how it behaves under pressure. You can do this with a special battery load tester, or you can have a mechanic perform this test. If the battery voltage drops significantly under load (for example, below 9.6 volts), If the battery voltage is low or the car will not start, you may need to replace the battery or check the charging system. Always make sure the car is turned off and take the necessary safety precautions when handling the battery. If you are unsure about any part of the testing process, consider consulting a professional mechanic for further assistance.