Car electrical problems can be challenging to diagnose, but understanding the symptoms and knowing how to approach troubleshooting can help you resolve them efficiently. From issues with the battery and alternator to faulty wiring and blown fuses, diagnosing electrical problems is essential for keeping your vehicle running smoothly. This guide will walk you through the process of diagnosing common car electrical issues.
Step 1: Identify the Symptoms of Electrical Issues
Before you start diagnosing any car electrical issues, it’s important to pay attention to the symptoms. Common signs of electrical problems include:
- Dim or Flickering Lights: This could indicate a weak battery or alternator problems.
- Car Won’t Start: If your car struggles to start or won’t start at all, it might be an issue with the battery, starter, or alternator.
- Electrical Components Not Working: Issues such as power windows, locks, or radio not functioning could point to a problem with the electrical system or blown fuses.
- Warning Lights: Dashboard warning lights, such as the battery or alternator light, can signal an electrical issue.
Understanding the symptoms will give you a clearer starting point for your diagnostic process.
Step 2: Check the Battery
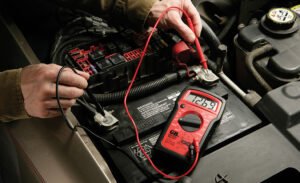
The battery is often the most common cause of electrical issues in cars. If your car won’t start or is having trouble cranking, the battery may be the problem. The first step is to test the battery voltage using a multimeter. A healthy, fully charged battery should show around 12.6 volts when the engine is off and between 13.5 to 14.5 volts when the engine is running. If the voltage is too low, you may need to recharge or replace the battery.
Additionally, check for any signs of corrosion around the battery terminals. Corroded terminals can impede the flow of electricity, leading to issues with starting the vehicle or powering electrical components. Clean the terminals using a mixture of baking soda and water or a dedicated battery terminal cleaner.
Step 3: Inspect the Alternator
The alternator is responsible for charging the battery while the engine is running. If your alternator isn’t functioning properly, the battery won’t charge, leading to a drained battery and electrical issues. To check if the alternator is the cause of the problem, measure the battery voltage again with the engine running. A healthy alternator should produce a reading between 13.5 to 14.5 volts. If the voltage is lower than this range, the alternator may not be charging the battery adequately, indicating the need for repairs or replacement.
You can also listen for any strange noises coming from the alternator, such as whining or grinding, which may indicate internal damage. If the alternator light on the dashboard is illuminated, it may signal a problem with the alternator.
Step 4: Examine the Fuses
Fuses protect electrical components from overloads and prevent damage to the car’s electrical system. If a fuse blows, it can cause various electrical components to stop working, such as headlights, power windows, or the radio. To check for blown fuses, refer to your car’s owner’s manual to locate the fuse box and identify the relevant fuses.
Once you find the fuses associated with the malfunctioning component, visually inspect them to see if any are burned out. If a fuse is blown, replace it with one of the same amperage rating. If the new fuse blows quickly, this could indicate a deeper electrical problem, such as a short circuit or a malfunctioning component.
Step 5: Look for Faulty Wiring or Connections
Wiring issues can cause a variety of electrical problems, including intermittent power loss, blown fuses, and even electrical fires. Inspect the wiring for any visible damage, such as fraying, cracking, or burns. Focus on areas where the wiring might be exposed to heat, moisture, or physical wear, such as under the hood, near the battery, or around moving parts.
If you find any damaged wires, they may need to be repaired or replaced. Be sure to disconnect the battery before working on any electrical wiring to avoid shock or short-circuiting.
Step 6: Test the Starter Motor
If your car isn’t starting and the battery and alternator seem fine, the issue could be with the starter motor. The starter motor is responsible for turning the engine over when you turn the ignition key. If you hear a clicking sound when trying to start the car, it may indicate that the starter motor is faulty.
To diagnose a starter motor issue, try tapping the starter motor lightly with a hammer while someone else attempts to start the car. If the car starts after tapping the motor, it could indicate that the starter is worn out and may need to be replaced.
Step 7: Use a Diagnostic Scan Tool
If you’re unable to identify the issue through basic inspections, a diagnostic scan tool can help pinpoint electrical problems. Many modern cars have onboard diagnostic systems (OBD-II) that can detect and store error codes related to electrical issues. A scan tool can read these codes and give you valuable information about where the problem might lie, whether it’s with the engine control unit (ECU), sensors, or another component.
Step 8: Seek Professional Help
While diagnosing common car electrical issues can often be done at home, some problems require specialized knowledge and tools. If you’re unsure about your findings or if the problem persists after your efforts, it’s best to consult a professional mechanic. Electrical issues can be complex, and a trained technician can use advanced diagnostic equipment to find and fix the problem safely.
Conclusion
Diagnosing car electrical issues involves a systematic approach to identify common problems like a dead battery, faulty alternator, blown fuses, or damaged wiring. By understanding the symptoms and following the steps outlined above, you can troubleshoot many electrical issues on your own. However, if you’re ever in doubt or the issue is more complicated, it’s always a good idea to seek the help of a professional mechanic to ensure your vehicle stays in optimal condition.