Your car’s air filter keeps dirt, dust, and debris out of the engine, ensuring clean air for combustion and optimal performance. Replacing a clogged filter is a simple intermediate DIY task that boosts power, efficiency, and engine longevity. This guide is for car owners with basic mechanical skills, explaining why air filter replacement matters, how to do it safely, and how to choose the right filter. With detailed steps, safety precautions, and practical tips, you’ll gain the confidence to tackle this repair and keep your engine breathing freely.
Why Air Filter Replacement Matters
The air filter traps contaminants before air enters the engine, protecting components like pistons, valves, and sensors from wear. A clogged filter restricts airflow, reducing acceleration, lowering fuel economy (by up to 10%, per the U.S. Department of Energy), and increasing emissions. Dirty filters can also foul mass airflow sensors ($100–$400 to replace), per automotive repair estimates. Poor air filtration contributes to engine deposits, shortening motor life.
Most manufacturers recommend replacing air filters every 15,000–30,000 miles, though dusty conditions or heavy traffic may require changes every 6,000–12,000 miles. The job costs $5–$30 for a filter and takes 5–20 minutes, saving $30–$100 versus a shop’s labor. Easier than battery swaps and ideal for DIYers honing their skills, it’s a quick win for performance. By replacing your air filter, you’ll restore power, save fuel, and protect your engine’s health.
Tools and Materials Needed
You’ll need minimal tools to replace an air filter:
- For Removal and Installation:
- Replacement air filter (correct type for your vehicle, e.g., paper, foam, reusable)
- Screwdriver (Phillips or flathead, for airbox clips or screws)
- Clean rags or paper towels (to wipe dust)
- For Access and Inspection:
- Gloves (nitrile to keep hands clean)
- Flashlight (to see inside airbox)
- Owner’s manual (to confirm filter location and part number)
- Optional:
- Socket set (e.g., 8mm–10mm, if airbox is bolted)
- Ratchet wrench (3/8-inch drive, for bolts)
- Vacuum cleaner (to clean airbox)
- Compressed air (low-pressure can, $5–$10, to blow out debris)
- Notebook (to log mileage and filter type)
- OBD-II scanner ($20–$50, to check codes if performance lags)
- Mask (to avoid inhaling dust from a clogged filter)
To choose the right filter, check your owner’s manual or an auto parts store’s fitment guide. For example, a 2020 Toyota Corolla might use a Fram CA10171 paper filter, while a 2018 Ford F-150 could need a Motorcraft FA-1883. Decide between paper (standard, $5–$20), foam (off-road, $10–$30), or reusable (e.g., K&N, $30–$60, cleanable). Quality brands (e.g., WIX, Purolator) ensure fit and filtration over generics.
Safety First: Working in the Engine Bay
Air filter replacement is low-risk but involves engine components and dust. Follow these precautions:
- Work When Cold: Wait 30–60 minutes after driving to avoid hot engine risks (up to 400°F).
- Park Safely: Use a flat surface with the parking brake engaged to prevent movement.
- Turn Off the Engine: Remove keys to avoid fan or electrical issues.
- Wear Gloves and Mask: Protect against dust or allergens, especially if the filter is clogged.
- Handle Airboxes Gently: Cracked plastic costs $50–$200 to replace.
- Work in a Ventilated Area: Dust can irritate; ensure airflow (open hood, garage door).
- Avoid Debris in Intake: Cover openings to prevent dirt entering the engine ($100–$1,000 for repairs).
If you’re new to engine bay work, watch a model-specific video (e.g., “2021 Honda Civic air filter replacement”) and work in a well-lit area. Keep a phone handy for diagrams or part lookups.
Step 1: Preparing to Replace the Air Filter
Proper prep ensures a quick job. Here’s how to start:
- Verify Replacement Need:
- Check mileage (e.g., due at 20,000 miles per manual).
- Look for symptoms:
- Reduced Power: Sluggish acceleration or weak throttle response.
- Poor Mileage: 5–10% fuel economy drop.
- Rough Idle: Engine hesitates or shakes.
- Dirty Appearance: Visible dust or grime on filter (check through airbox if accessible).
- Use an OBD-II scanner for codes (e.g., P0171 for lean mixture may indicate restriction).
- Gather Parts and Tools:
- Buy the correct filter (e.g., WIX WA10312 for a 2019 Chevy Equinox).
- Confirm tools match your airbox (e.g., Phillips screws for Toyotas, clips for Fords).
- Have a vacuum ready for dusty airboxes.
- Prepare the Car:
- Park on a flat surface, engage the parking brake, and turn off the ignition.
- Pop the hood and secure it.
- Clear loose items (e.g., tools, rags) from the engine bay to avoid drops.
- Locate the Air Filter:
- Find the airbox, a plastic housing (often black, 8–12 inches wide) in the engine bay.
- Common Spots: Near the engine’s front (2020 Toyota RAV4), driver’s side (2017 Dodge Ram), or passenger side (2022 Nissan Altima).
- Identify the intake tube leading to the throttle body or mass airflow sensor.
- Check your manual or search (e.g., “2018 Ford Escape air filter location”). For example, a 2021 Kia Sorento has it near the battery.
- Find the airbox, a plastic housing (often black, 8–12 inches wide) in the engine bay.
Pro Tip: Lay a clean rag under the airbox to catch dust, and take a photo of the airbox and clips for reassembly reference.
Step 2: Removing the Old Air Filter
Remove the filter carefully to avoid debris:
- Access the Airbox:
- Inspect the airbox for fasteners:
- Clips: Metal or plastic (2–4, common in Hondas, Nissans).
- Screws: Phillips or 8mm–10mm bolts (Toyotas, Chevys).
- Hinges: Some pivot open (Fords).
- Release clips by hand or unscrew bolts/screws, placing them in a safe spot ($2–$10 to replace).
- If sensors (e.g., mass airflow) are attached, unplug by pressing tabs and pulling gently.
- Inspect the airbox for fasteners:
- Open the Airbox:
- Lift or pivot the airbox lid (wiggle if stuck, don’t force—cracks cost $50–$200).
- If the intake tube is clamped, loosen with a screwdriver and detach (note orientation).
- Set the lid aside, avoiding dirt on the clean side.
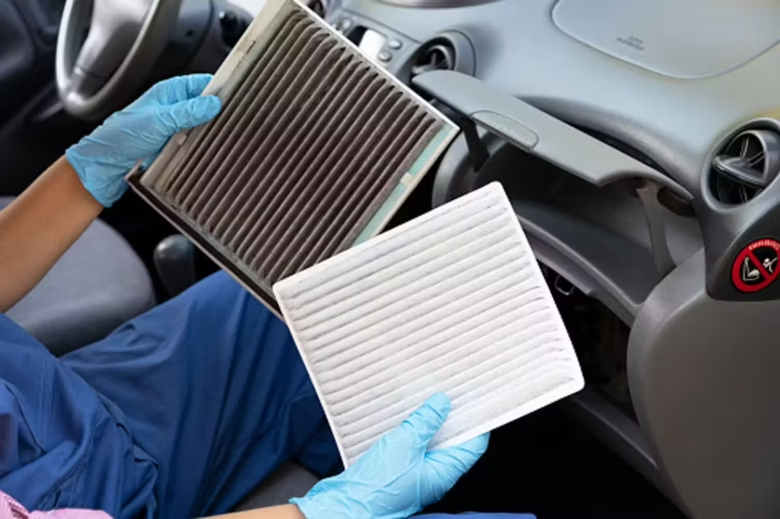
- Remove the Old Filter:
- Pull the filter straight out (may be snug, held by edges or tabs).
- Note orientation (e.g., “up” marking or rubber seal position).
- Inspect condition:
- Clogged: Black, dusty, or leafy.
- Normal: Light dirt or pollen.
- Damaged: Torn or wet (check intake for leaks, $50–$300).
- Place the old filter in a bag to contain dust.
- Clean the Airbox:
- Vacuum debris (dirt, leaves) from the airbox with a hose attachment.
- Wipe with a damp rag (no soap) and dry thoroughly to prevent mold.
- Check for cracks or loose seals ($50–$200 to replace).
- Ensure no debris falls into the intake tube (cover with a rag if open).
Note: If the filter is oily or soaked, suspect crankcase or turbo issues—address before installing a new filter ($200–$1,500).
Step 3: Installing the New Air Filter
Install with care for optimal airflow:
- Prepare the New Filter:
- Compare it to the old one (size, shape, seal type).
- Check for “up” or “this side out” markings to match orientation.
- If reusable (e.g., K&N), ensure it’s clean and oiled per instructions.
- Install the Filter:
- Place the filter in the airbox, aligning with grooves or tabs.
- Ensure the rubber seal sits flush to prevent unfiltered air leaks.
- If it doesn’t fit, don’t force—verify part number or clear debris ($5–$30 wasted).
- Close the Airbox:
- Reattach the lid, ensuring it seals tightly (no gaps).
- Secure clips, screws, or bolts (snug, ~2–5 ft-lbs for bolts).
- Reconnect the intake tube if removed, tightening clamps firmly.
- Replug sensors, confirming clicks.
- Check Fitment:
- Press the airbox gently—no rattles or loose parts.
- Verify hoses and sensors are secure (pinched wires cost $20–$100).
- Clean Up:
- Vacuum any dust that escaped during removal.
- Dispose of the old filter in a sealed bag (trash, as paper filters aren’t recyclable; reusable ones clean per brand).
Step 4: Testing and Final Checks
Verify the new filter works:
- Start the Engine:
- Start the car and listen for smooth idling (no surging or hissing).
- Check for vacuum leaks (whistling near airbox).
- Drive Test:
- Drive 10–20 miles, mixing city and highway speeds.
- Note improved acceleration, smoother throttle, or better mileage (e.g., 1–2 mpg gain).
- If sluggishness or codes appear (e.g., P0101), recheck airbox seal or sensor connections ($50–$400).
- Recheck After Use:
- After 50–100 miles, inspect the airbox for looseness or dust leaks.
- Rescan for codes if an OBD-II scanner was used initially.
- Dispose of Waste:
- Discard bagged filters properly—avoid littering to prevent dust spread.
- Clean tools to remove grime or grease.
Pro Tip: Log mileage and filter type (e.g., “Fram CA10171, 25,000 miles, Jul 2025”) to track intervals, and check the filter at oil changes for early clogs.
Common Mistakes to Avoid
- Wrong Filter: Incorrect size or type leaks air ($5–$30 wasted).
- Poor Fitment: Loose filters allow dirt into the engine ($100–$1,000).
- Forcing Airboxes: Cracked plastic costs $50–$200.
- Dirty Intake: Debris in the throttle body harms sensors ($100–$400).
- Skipping Sensors: Unplugged airflow sensors trigger codes ($20–$100).
- Over-Oiling Reusables: Excess oil fouls sensors ($100–$400).
When to Seek Professional Help
Most air filter replacements are DIY-friendly, but see a mechanic if:
- Persistent Codes: Post-replacement issues (e.g., P0171, P0102) suggest sensor or intake problems ($100–$600).
- Damaged Airbox: Cracked or warped units need replacement ($50–$200).
- Complex Systems: Some cars (e.g., turbo Audis) have intricate intakes ($100–$300 labor).
- Oil Contamination: Oily filters signal crankcase issues ($200–$1,500).
- Performance Lags: Rough running may mean fuel or ignition faults ($200–$1,000).
Shops charge $30–$100 for filter swaps, but DIY saves money and teaches intake basics.
Additional Tips for Air Filter Success
- Check in Dust: Rural or construction zones clog filters faster—inspect every 6 months.
- Pair with Tune-Ups: Swap during oil changes for efficiency.
- Learn Symptoms: Weak power or black exhaust signal a dirty filter.
- Keep Spares: Store a filter ($5–$20) in your garage, matching your spec.
- Clean Reusables Right: Follow brand instructions (e.g., K&N kits, $10–$20) to avoid damage.
- Track Seasons: Log swaps (e.g., “Spring 2026”) to align with pollen or dust peaks.
Environmental and Cost Benefits
A clean air filter boosts efficiency, cutting fuel use and emissions by 5–10%, or 50–100 pounds of CO2 yearly, per EPA estimates. It protects engines, reducing metal/plastic waste from wear. DIY saves $30–$100 per swap, and buying filters in bulk (e.g., Amazon, $5–$15) lowers costs. Dispose of filters properly—dusty paper filters aren’t recyclable but sealed bags prevent litter. Reusable filters (cleaned) further cut waste.
Conclusion
Replacing your car’s air filter is a fast, impactful DIY task that enhances performance and engine life. By following these steps—choosing the right filter, installing carefully, and testing thoroughly—you’ll restore power and save fuel. This guide suits DIYers ready for intermediate work, while tips like tracking seasons or sparing reusables help all drivers.
Next, try tasks like batteries or PCV valves to grow your skills (see prior articles). If power lags or codes persist, consult a mechanic for sensor checks. With a screwdriver and a few minutes, you’re set for a smoother, stronger ride!