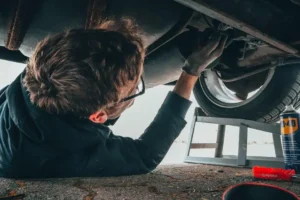
A blown car fuse can disable critical systems like lights, radio, or power windows, but troubleshooting and replacing one is a straightforward DIY task. This guide is for car owners with beginner to intermediate skills, explaining why fuses matter, how to diagnose a faulty one, and how to replace it safely. With detailed steps, safety precautions, and practical tips, you’ll gain the confidence to fix electrical issues and keep your vehicle running smoothly.
Why Fuse Troubleshooting Matters
Fuses protect a car’s electrical circuits by breaking the connection if current exceeds safe levels, preventing damage to wiring or components. A blown fuse causes systems to fail—headlights dim, wipers stop, or accessories quit—potentially compromising safety. For example, 10% of nighttime crashes involve lighting failures, per the National Highway Traffic Safety Administration, some tied to fuses. Ignoring the cause of a blown fuse risks repeated failures or fires ($500–$5,000 for wiring repairs), per automotive repair estimates.
Fuses rarely fail without reason (e.g., overload, short circuit) and cost $0.50–$5 to replace, with the job taking 15–45 minutes. This saves $50–$150 versus a shop’s diagnostic fee. Easier than battery swaps and requiring no special tools, it’s perfect for DIYers starting electrical repairs. By troubleshooting and replacing a faulty fuse, you’ll restore function, enhance safety, and avoid costly damage.
Tools and Materials Needed
You’ll need minimal tools to troubleshoot and replace a fuse:
- For Diagnosis and Replacement:
- Replacement fuses (assorted mini, micro, or standard blade fuses, $5–$15 for a pack)
- Fuse puller (plastic, often in fuse box, or $2–$5)
- Flashlight (to see in dim areas)
- Owner’s manual (to locate fuse boxes and chart)
- For Testing:
- Multimeter ($10–$30, to check continuity or voltage)
- Test light ($5–$15, to verify power)
- Clean rags (to wipe dirt or corrosion)
- For Safety and Access:
- Gloves (nitrile to protect hands from grease)
- Safety glasses (to shield eyes from sparks)
- Optional:
- Fuse box diagram (downloadable if manual is missing)
- Small screwdriver (flathead, to pry covers)
- Notebook (to log fuse ratings and issues)
- Wire brush ($3–$5, to clean corrosion)
- Electrical tape ($3–$5, for minor wire fixes)
- OBD-II scanner ($20–$50, if related codes appear)
To choose the right fuse, check your owner’s manual or fuse box cover for type and amperage (e.g., 10A, 20A). Common types include mini (newer cars like a 2020 Toyota Corolla) or standard blade (older, like a 1995 Ford F-150). Match color and rating (e.g., red = 10A, yellow = 20A). Quality brands (e.g., Bussmann, Littelfuse) ensure reliability over generics.
Safety First: Working with Car Electrical Systems
Fuse replacement involves low-voltage systems but still requires caution. Follow these precautions:
- Turn Off the Engine: Remove keys to prevent electrical surges or accidental starts.
- Disconnect the Battery: Detach the negative terminal (black, -) for major work to avoid shorts (optional for simple fuse swaps).
- Park Safely: Use a flat surface with the parking brake engaged to avoid movement.
- Wear Protective Gear: Gloves and safety glasses protect against sparks or debris.
- No Metal Tools on Fuses: Use plastic pullers to avoid shorts ($5–$50 for circuit damage).
- Avoid Wet Conditions: Water increases shock risk, even at 12V—work in a dry area.
- Match Amperage: Using a higher-rated fuse risks fires ($500–$5,000).
- Work in a Well-Lit Area: Dim light leads to errors—use a flashlight if needed.
If you’re new to electrical repairs, watch a basic video (e.g., “How to check car fuses”) and keep a phone handy for fuse charts or emergency contacts. Avoid touching exposed wires unless the battery is disconnected.
Step 1: Diagnosing a Faulty Fuse
Pinpoint the issue before replacing anything. Follow these steps:
- Identify Symptoms:
- Note what’s not working:
- Lights: Headlights, brake lights, or interior lights dim or dead.
- Accessories: Radio, power windows, or wipers fail.
- Systems: AC, horn, or turn signals don’t respond.
- Check if multiple systems fail (e.g., radio and windows), suggesting a shared fuse.
- Use an OBD-II scanner for related codes (e.g., U0155 for electrical issues).
- Note what’s not working:
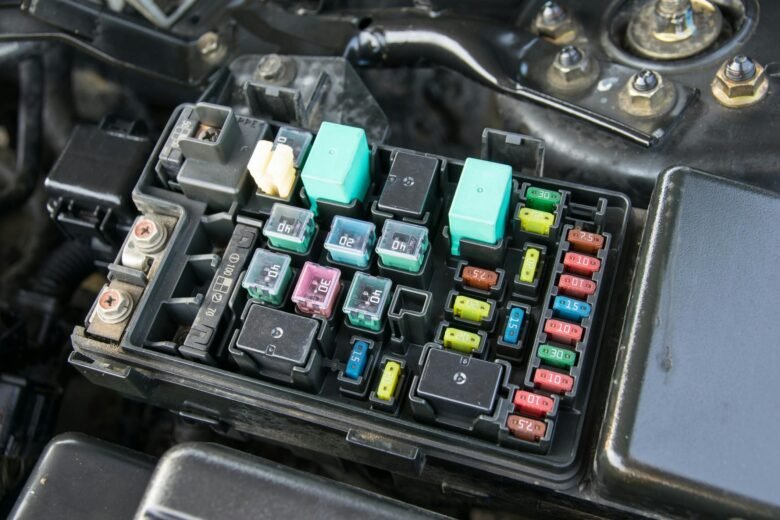
- Locate the Fuse Box:
- Find the fuse box(es) using your manual:
- Interior: Often under the dashboard, driver’s side (e.g., 2021 Honda Civic), or passenger side (e.g., 2018 Dodge Ram).
- Engine Bay: Near the battery or fender (e.g., 2020 Chevy Equinox).
- Look for a plastic cover labeled “Fuses” or with a diagram.
- Some cars (e.g., BMWs) have rear trunk boxes—check all locations.
- Find the fuse box(es) using your manual:
- Access the Fuse Box:
- Remove the cover (press tabs or pry gently with a screwdriver).
- Find the fuse chart (on cover, in manual, or online, e.g., “2019 Ford Escape fuse diagram”).
- Identify the suspect fuse by function (e.g., “Headlights, 15A, Fuse #12”).
- Inspect Visually:
- Use a flashlight to check the fuse:
- Blown: Metal strip inside is broken, melted, or blackened.
- Intact: Strip is continuous and clear.
- Look for corrosion or loose connections in the box ($5–$50 to clean or replace).
- Use a flashlight to check the fuse:
- Test the Fuse:
- Method 1: Multimeter:
- Set to continuity (beep) or ohms.
- Touch probes to both fuse prongs (removed fuse).
- No beep or infinite ohms = blown.
- Method 2: Test Light:
- With the circuit on (e.g., key to “on” for radio), clip light to ground (metal chassis).
- Touch both fuse slots—if light doesn’t glow on one side, fuse is blown.
- Method 3: Swap Test:
- Swap with a same-rated fuse from a non-critical circuit (e.g., rear wiper).
- If the system works, the original fuse was blown.
- Method 1: Multimeter:
- Check for Underlying Issues:
- If a fuse blew, note possible causes:
- Overload: Too many accessories (e.g., phone chargers, $5–$50).
- Short Circuit: Damaged wiring or wet connectors ($50–$500).
- Faulty Component: Bad motor or relay ($100–$800).
- Repeated blowing suggests deeper problems—don’t ignore.
- If a fuse blew, note possible causes:
Pro Tip: Photograph the fuse box layout before removing anything, and write down symptoms (e.g., “No brake lights, checked Apr 2025”) to track patterns.
Step 2: Removing the Faulty Fuse
Remove the blown fuse safely:
- Prepare the Circuit:
- Turn off the ignition and all accessories (e.g., lights, radio).
- If testing showed a blown fuse, note its position (e.g., “F15, 10A”).
- Extract the Fuse:
- Use a plastic fuse puller (in box or kit) to grip the fuse and pull straight out.
- If no puller, use fingers (dry hands) or needle-nose pliers (non-metal tips).
- Avoid wiggling—bent slots cost $5–$50 to fix.
- Inspect again: Confirm the strip is broken or melted.
- Check the Slot:
- Look for burn marks, corrosion, or loose clips in the fuse box.
- Clean with a wire brush or contact cleaner ($5–$10) if dirty.
- If damaged, plan box repair ($50–$200).
- Store the Old Fuse:
- Keep it temporarily to match size and rating at the store.
- Dispose later (recyclable at electronics centers).
Note: If the fuse looks intact but the system fails, test wiring or components with a multimeter ($50–$500 for repairs) before proceeding.
Step 3: Installing the New Fuse
Replace with the correct fuse:
- Select the New Fuse:
- Match the old fuse’s type (mini, micro, standard) and amperage (e.g., 15A).
- Check color (e.g., blue = 15A, red = 10A) and label (e.g., “ATM 15”).
- Avoid higher ratings—10A in a 5A slot risks fires ($500–$5,000).
- Insert the Fuse:
- Push the new fuse into the same slot, ensuring it seats fully (clicks or feels firm).
- Verify alignment—crooked fuses cause poor contact ($5–$50).
- Check Surrounding Fuses:
- Inspect nearby fuses for looseness or corrosion.
- Press gently to ensure all are secure.
- Close the Fuse Box:
- Replace the cover, ensuring clips snap shut.
- Clear any tools or rags from the area.
Step 4: Testing and Final Checks
Confirm the repair:
- Test the Circuit:
- Turn the key to “on” or start the engine.
- Activate the affected system (e.g., headlights, wipers).
- Verify normal operation (e.g., bright lights, smooth windows).
- Drive Test:
- Drive 5–10 miles, cycling the system (e.g., turn signals, radio).
- Check for consistent performance—no flickering or shutdowns.
- If the fuse blows again, stop and investigate (see below).
- Monitor for Recurrence:
- After 50–100 miles, recheck the fuse visually or with a multimeter.
- Repeated failures indicate:
- Short Circuit: Inspect wiring for fraying or water ($50–$500).
- Overloaded Circuit: Remove extra accessories ($5–$50).
- Bad Component: Test motors or relays ($100–$800).
- Clean Up:
- Recycle old fuses at auto stores or e-waste centers (small metal/plastic parts).
- Store spare fuses in your glovebox ($5–$15 pack).
- Clean tools to remove grease or dirt.
Pro Tip: Log the fuse number and system (e.g., “F12, 15A, headlights, May 2025”) to track replacements, and keep a fuse assortment in your car for emergencies.
Common Mistakes to Avoid
- Wrong Fuse: Higher amperage causes fires ($500–$5,000).
- Ignoring Cause: Replacing without checking risks recurrence ($50–$800).
- Metal Tools: Shorting circuits damages wiring ($5–$50).
- Hot Swapping: Changing fuses with power on sparks ($5–$200).
- Skipping Tests: Unverified fixes hide deeper issues ($100–$1,000).
- Dirty Slots: Corrosion reduces contact ($5–$50).
When to Seek Professional Help
Most fuse replacements are DIY-friendly, but see a mechanic if:
- Repeated Blowing: Suggests shorts or faulty components ($100–$1,000).
- Complex Systems: CAN bus or hybrid electronics need diagnostics ($200–$2,000).
- Burnt Fuse Box: Melted or cracked boxes require replacement ($200–$800).
- No Power After Swap: Wiring or ECU issues ($500–$5,000).
- Uncertain Diagnosis: Multiple failures need multimeter tracing ($80–$300).
Shops charge $50–$200 for fuse fixes, but DIY saves money and teaches electrical basics.
Additional Tips for Fuse Success
- Keep Spares: Store a fuse kit ($5–$15) in your trunk.
- Check Annually: Inspect fuses during oil changes for corrosion.
- Label Boxes: Mark covers with functions if unclear (e.g., “F10 = AC”).
- Test Accessories: Remove aftermarket chargers to prevent overloads ($5–$50).
- Clean Connections: Brush corrosion every 2 years ($3–$10).
- Track Patterns: Log failures (e.g., “3rd headlight fuse, Jun 2026”) to spot issues.
Environmental and Cost Benefits
A working electrical system optimizes efficiency, cutting fuel use and emissions by 2–5%, or 20–50 pounds of CO2 yearly, per EPA estimates. Fixing fuses prevents wiring damage, reducing copper/plastic waste. DIY saves $50–$150, and bulk fuse packs (e.g., Amazon, $5–$10) lower costs. Recycle old fuses at NAPA or e-waste centers to reclaim materials, minimizing landfill impact.
Conclusion
Troubleshooting and replacing a faulty car fuse is a quick DIY task that restores critical systems and enhances safety. By following these steps—diagnosing accurately, replacing correctly, and testing thoroughly—you’ll fix issues confidently. This guide suits DIYers from beginners to intermediates, while tips like keeping spares or logging failures help all drivers.
Next, try tasks like checking tire pressure or replacing wiper blades to build skills (see related guides). If fuses keep blowing, consult a mechanic for wiring checks. With a fuse puller and a few minutes, you’re set for a fully powered ride!